The Free Screenshot Robot: App Store Assets in Ten Languages, Zero Clicks
Contents
English
Updated 6 August 2026. The shape below is the one I still use; the parts underneath it changed. The pipeline is now one installed program, appkit — the stage-by-stage sections have been rewritten to match, and the fastlane and NumPy versions are gone. If you want the engineering rather than the blueprint, that’s appkit: One Installed Program.
App Store screenshots are the chore nobody warns you about. A finished iOS app needs a set per language, a set per device family, and a fresh set every time you nudge a color. For Zestimer that is ten languages × about ten scenes × iPhone-plus-Watch — a hundred and forty-three images — and the moment I touched the design system, all of them were wrong.
So I did what any tired solo developer does: I built a robot. This post is the blueprint — every stage, and the free parts list, so you can lift it wholesale.
The Shape of It
A screenshot pipeline looks like four jobs pretending to be one:
- Capture — clean pixels of each screen, in each language.
- Render — those pixels, in framed and captioned marketing cards.
- Stabilize — know, reliably, whether anything actually changed.
- Upload — push the final set to the store.
It took me a year to notice there is a fifth, and that I had been doing it with my eyes. More on that below.
Stage 1: Capture Inside the App, Not the UI
The standard advice is to drive XCUITest — launch the app, tap through to each screen, snapshot. I find UI tests for screenshots miserable: slow, flaky, and broken every time a button moves.
The trick is to make screenshots a feature of the app, reachable by a launch argument. Zestimer ships a -ScreenshotMode that swaps in an in-memory SwiftData store, seeds deterministic demo data, and reads -ScreenshotScene to jump straight to one surface. No tapping, no navigation. Each screen is one launch:
Zestimer -ScreenshotMode -ScreenshotScene activeWorkout -AppleLanguages "(ja)"
Loop that over {scene} × {language} and the set falls out in a couple of minutes. Because the data is seeded rather than live, the Japanese card and the German card show the same workout — which is what you want when a reviewer compares locales. The one rule that saved me: an unknown scene should trap, not silently fall back, or you ship an English card in a Korean listing and never notice.
The other half is knowing when the screen is ready. Don’t sleep for a guessed number of seconds — snap until two consecutive frames are byte-identical. A screen nobody is animating renders the same bytes every frame, so the shutter can ask the screen instead of guessing.
Everything here is free and Apple-native: simctl for boot, appearance, status-bar override (pin it to 9:41), and capture.
Stage 2: Render the Cards — Screenshots Are Ads
Raw simulator captures are documentation. The store wants advertisements: a device frame, a headline that sells one idea, an on-brand background.
I compose them with CoreGraphics and CoreText, driven by a JSON storyboard the app repo owns — not a headless browser. Two reasons, and the second is the one that matters:
- CoreText is the only thing on the machine that lays out Japanese and Korean beside Latin from an explicit font cascade rather than a guess. Ten languages, one renderer, no font-per-script.
- It is byte-deterministic. Same storyboard and same captures in, same bytes out, every run, on every machine. Which sets up the next stage.
The storyboard is JSON rather than code so that it stays data — a preview, a second renderer, or a checker can read the same file.
Stage 3: Make Git the Source of Truth
This is the idea I am proudest of, and it survived every rewrite of everything around it.
The rendered cards are committed to git. If every render rewrites every file, git status is always dirty and you can never answer the only question that matters: did a screenshot actually change?
So after each render, compare each new card against the committed one, and where the picture did not change, put the old bytes back. Picture, not bytes: the simulator lays a faint dither over glass and gradients, so two captures of a screen nobody touched come back differing by a level or two in a few thousand pixels — invisible on any display, and enough to rewrite a card and put it in git status. The gate compares per channel with a small tolerance and restores anything under it.
Now a clean git status on the screenshots folder is the answer: nothing changed, skip the upload. No manifest, no hashes, no state file. The version control you already have becomes the change-detection system you didn’t want to build.
And it is worth saying out loud what a restored card means: a card held at the old bytes is a card that will not be uploaded. So a run that puts any back had a scene that would not hold still, and that is worth chasing rather than tolerating.
Stage 4: The Fifth Job — Look at Them
Here is the stage I had for a year without noticing it was one.
git status tells you whether a card changed. It cannot tell you which, because a PNG diff in a terminal is a line saying the bytes differ. So every release ended the same way: open the folder, click through forty images, decide if the German one still fits, and hope. That is not review. That is squinting.
So the pipeline now draws itself a contact sheet — one row per locale, one column per card, a red frame where git says a card changed and a green one where it is new:
appkit review screenshots
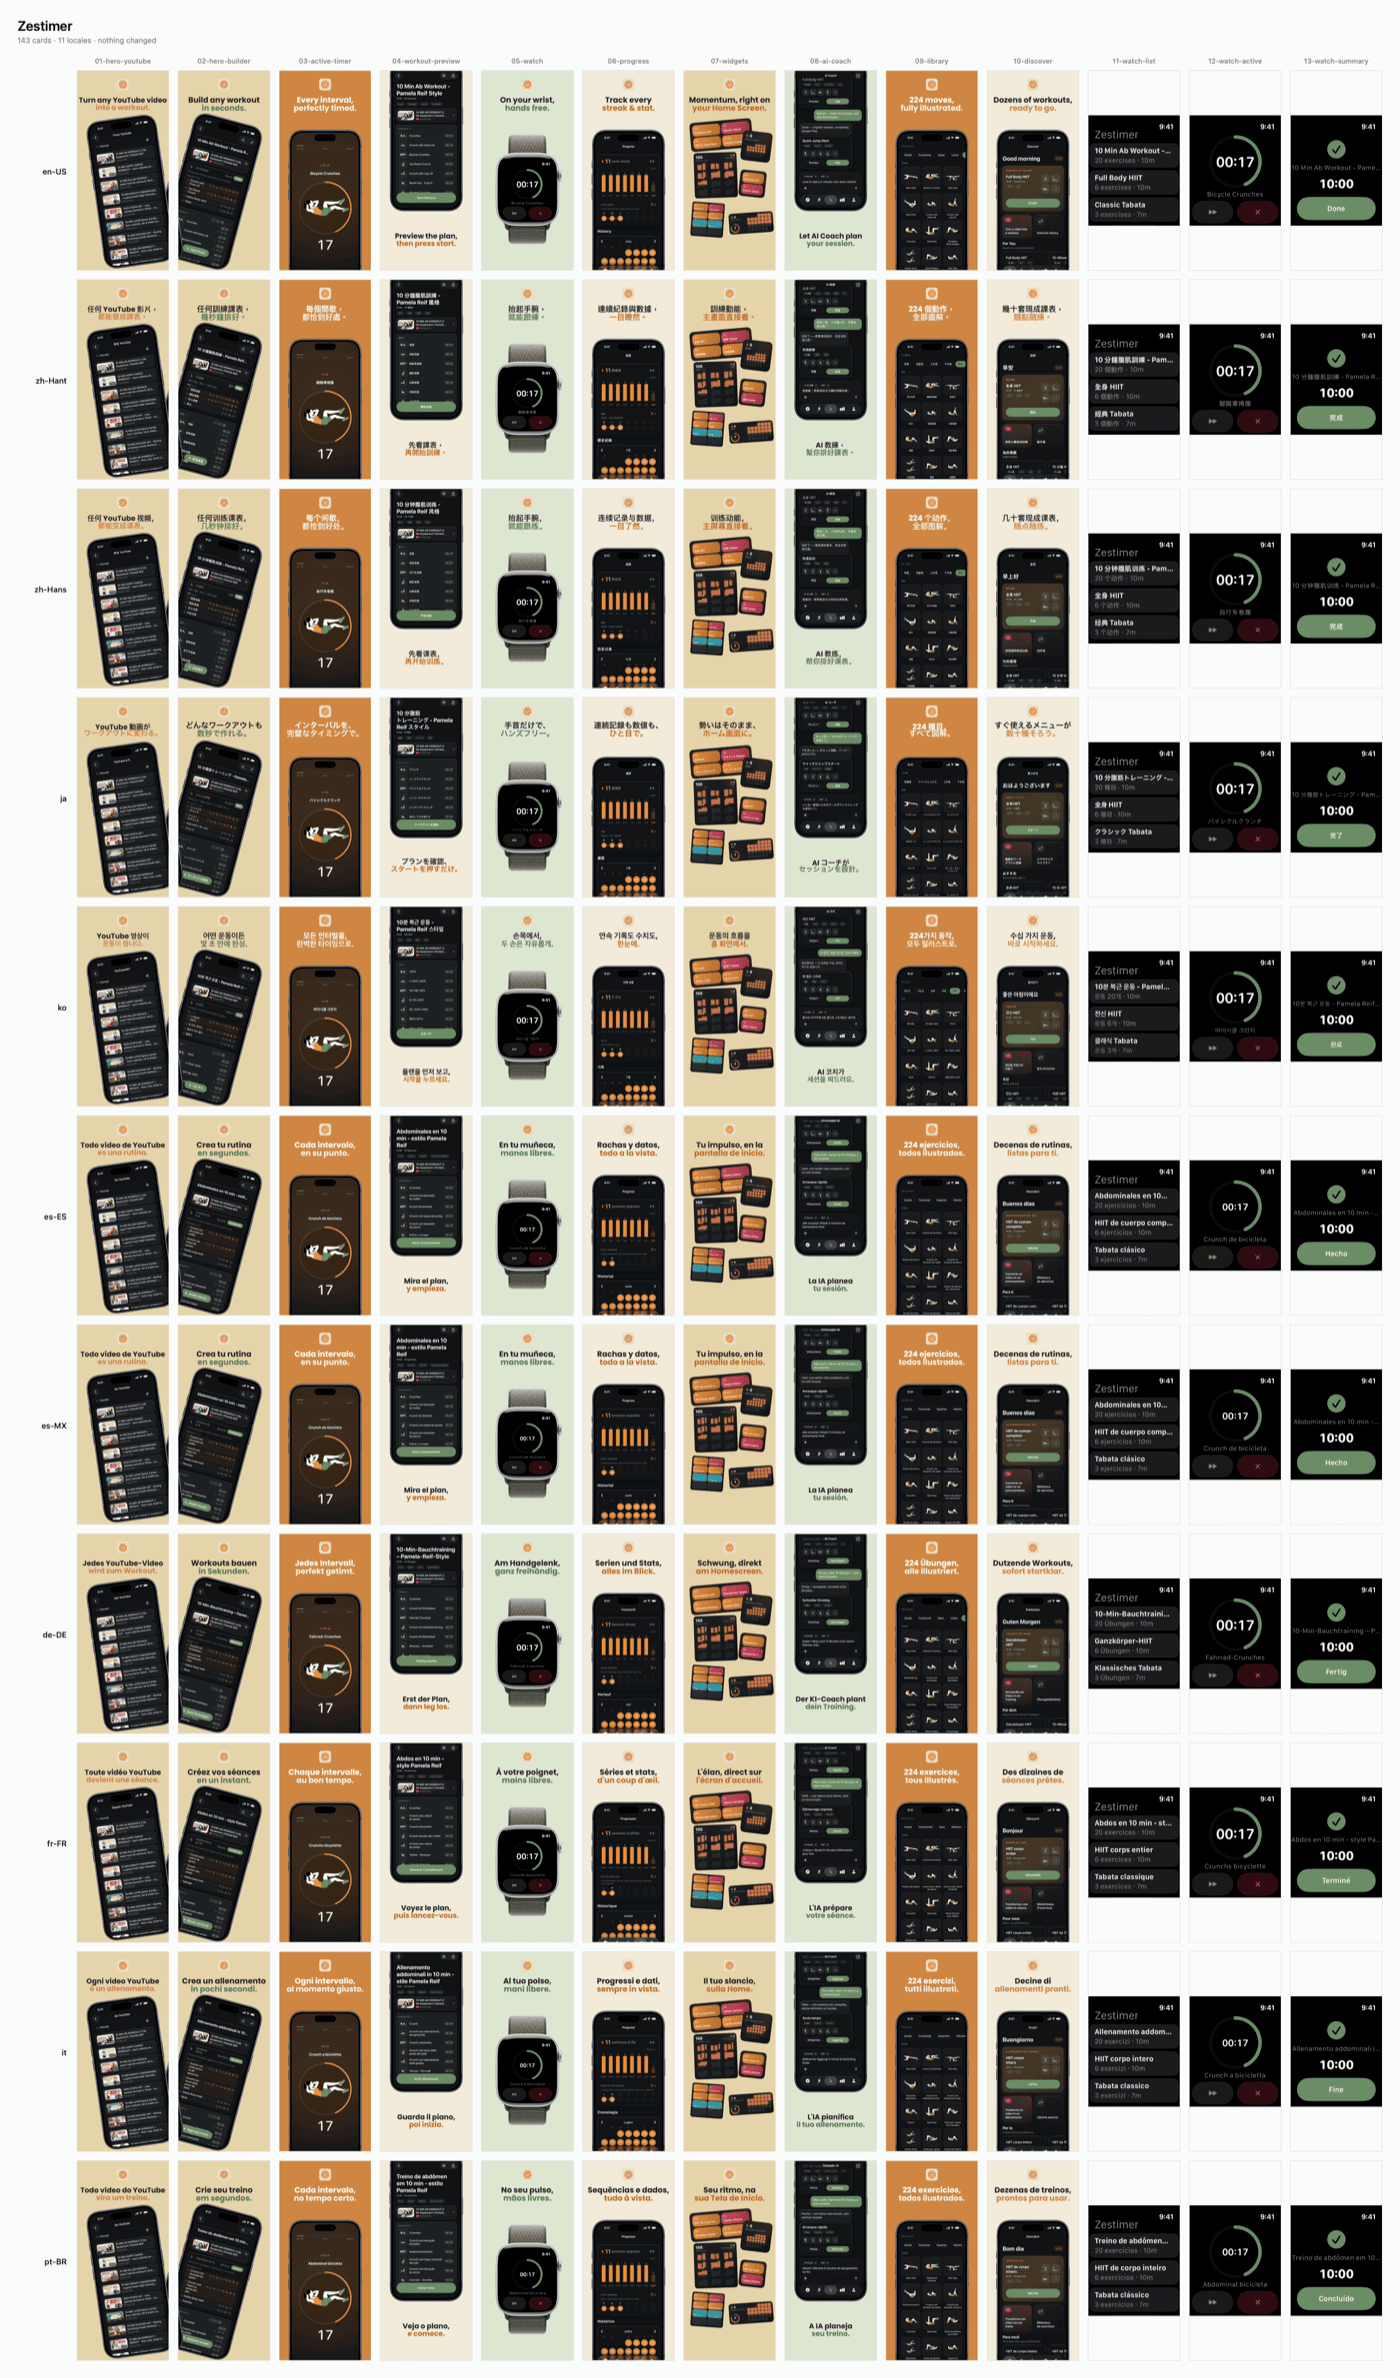
One picture, a hundred and forty-three cards, eleven languages. Three things fall out of it that no per-file diff ever showed me:
- A hole in the grid is a locale short of a scene. It is the single most common way a set goes wrong and the hardest to see one file at a time.
- A row that looks different from every other row is usually a language whose text overflowed, and you see it at a glance instead of at review time.
- A card framed red for no reason you can name is a screen that would not hold still. Chase it now, not after the upload.
The cost of finding out used to be opening App Store Connect and squinting. Now it is one command and one look.
Stage 5: Upload
The last mile is the store’s own API — asc for the App Store, the Publishing API for Play — wrapped so I never hold their flags in my head:
appkit upload screenshots 1.3.0
Two details worth stealing whatever you use:
- Images are filed to a device family by their pixel dimensions, and on the App Store
--device-typeis a filter. A set whose pixels match none of your declared types uploads zero files and reports success. I have shipped that bug. Check your card size against your declared display type on every run. - One capture set can feed two listings. Spanish ships as
es-ESandes-MX, with identical screenshots — render once, upload twice.
The Command Is the Mechanism, the Skill Is the Judgement
Scripts are still things to remember, in order, with the right arguments. The layer that makes it a robot is a Claude Code skill — and the split between the two is the part worth copying.
A command writes files and moves bytes. A skill carries the judgement a script does not have: whether a settle floor reaches past an animation’s start, whether this is the release where submitting is safe, whether a caption should be borrowed verbatim from the app’s own strings. /appkit-release is the runbook; appkit ship is the mechanism.
That’s the real unlock. The scripts made the work possible; the skill made it delegable — and unlike my memory of “what did I do last time”, a skill does not degrade between releases.
Copy This, For Free
| Stage | Tool | Cost |
|---|---|---|
| Capture | simctl + an in-app -ScreenshotMode | free (Apple) |
| Render | CoreGraphics + CoreText | free (Apple) |
| Stabilize | a same-picture gate over git | free |
| Review | a contact sheet | free |
| Upload | asc / the Play Publishing API | free |
| Orchestr. | a Claude Code skill + AGENTS.md | free |
Every line is free or open source, and all of it is appkit, which is one brew install.
The Takeaway
The screenshots were never the hard part. The hard part was the loop — that every design change silently invalidated a hundred images, and the cost of finding out was your own eyes.
Automating the capture saved minutes. Making git the source of truth saved the loop. Drawing the contact sheet was the one that surprised me: the stage I had never automated was the one I was doing manually every single release without ever calling it work.
中文
2026 年 8 月 6 日更新。 下面的「形狀」我到今天還在用;底下的零件全換過了。整條流程現在是一個安裝好的程式 appkit,各階段的內容已改寫成現況,fastlane 和 NumPy 那兩版都拿掉了。想看工程細節而不是藍圖的話,看 appkit:一個安裝好的程式。
App Store 截圖是沒人事先警告你的雜事。一個做完的 iOS App,每種語言要一組、每個裝置家族要一組,而且只是微調一個顏色,就得重做一次。以 Zestimer 來說,那是十種語言 × 大約十個畫面 × iPhone 加 Apple Watch——143 張圖——而我只要一動到設計系統,這 143 張就全部過時了。
於是我做了任何一個累壞的獨立開發者都會做的事:寫了一隻機器人。這篇是藍圖——每個階段,還有一份全免費的零件清單,讓你整套搬走。
全貌
一條截圖流程,看起來是四件事假裝成一件:
- 擷取——把每個畫面、每種語言拍成乾淨的像素。
- 渲染——把那些像素放進有外框、有標語的行銷卡。
- 穩定——可靠地知道「到底有沒有東西真的變了」。
- 上傳——把成品推上商店。
我花了一年才發現還有第五件,而且我一直是用眼睛在做它。下面會講。
第一步:在 App 內截圖,而不是驅動 UI
標準做法是驅動 XCUITest——啟動 App、一路點進每個畫面、截圖。我覺得用 UI 測試截圖很痛苦:又慢、又不穩,只要有顆按鈕移動就會壞掉。
關鍵是把截圖做成 App 本身的一個功能,用啟動參數就能到達。Zestimer 內建一個 -ScreenshotMode:換上記憶體內的 SwiftData store、塞入固定的示範資料,再讀 -ScreenshotScene 直接跳到某個畫面。不用點、不用導覽。每個畫面就是一次啟動:
Zestimer -ScreenshotMode -ScreenshotScene activeWorkout -AppleLanguages "(ja)"
在 {畫面} × {語言} 上跑一圈,整組圖幾分鐘就出來。因為資料是「種」進去的而不是真實資料,日文卡和德文卡顯示的是同一組訓練——這正是審查人員比對各語系時你會想要的。有一條規則救了我:碰到未知的畫面名稱應該直接 trap,而不是默默退回預設,否則你會在韓文 listing 裡放一張英文卡,卻永遠不會發現。
另一半是「畫面什麼時候好了」。不要 sleep 一個猜出來的秒數——一直拍到連續兩張畫格 byte 完全相同為止。沒有人在動畫的畫面,每一格都渲染出同樣的 bytes,所以快門可以「問畫面」,而不是用猜的。
這裡的一切都免費、而且是 Apple 原生的。
第二步:把截圖做成廣告卡
模擬器的原始截圖是「說明書」。商店要的是廣告:一個裝置外框、一句只賣一個賣點的標題、一個符合品牌調性的背景。
我用 CoreGraphics + CoreText 來合成,由 App repo 自己擁有的一份 JSON 分鏡表驅動——不是無頭瀏覽器。兩個理由,第二個才是重點:
- CoreText 是這台機器上唯一能用「明確的字型 cascade」把日文、韓文跟拉丁文排在一起的東西,而不是用猜的。十種語言、一個渲染器、不用每種文字配一套字型。
- 它逐位元組決定性(byte-deterministic)。 同樣的分鏡表加同樣的擷取,每次、每台機器都產生同樣的 bytes。這就接到下一步。
分鏡表是 JSON 而不是程式碼,是為了讓它保持是資料——預覽、第二個渲染器、或一個檢查器都能讀同一份檔案。
第三步:讓 Git 成為真相來源
這是我最得意的想法,而且它撐過了周圍所有東西的每一次重寫。
渲染出來的卡片會 commit 進 git。如果每次渲染都重寫每個檔案,git status 就永遠是髒的,你也永遠回答不了那個唯一重要的問題:到底有沒有哪張截圖真的變了?
所以每次渲染後,把每張新卡跟已 commit 的那張比對,只要畫面沒變,就把舊的bytes 放回去。是畫面,不是 bytes:模擬器會在玻璃和漸層上鋪一層很淡的抖動(dither),所以兩張「沒人動過的畫面」的截圖,會在幾千個像素上差一兩個色階——任何螢幕上都看不出來,卻足以重寫一張卡並讓它出現在 git status 裡。這道閘門逐通道比對、給一個很小的容差,低於容差的就還原。
於是截圖資料夾一個乾淨的 git status 本身就是答案:什麼都沒變,跳過上傳。不用清單、不用 hash、不用狀態檔。你早就有的版本控制,變成了那個你本來不想自己造的變更偵測系統。
還有一件值得說出口的事:一張被還原成舊 bytes 的卡,就是一張不會被上傳的卡。所以一次「有還原任何一張」的執行,代表有個畫面靜不下來——那該去追,而不是把容差調大。
第四步:第五件事——真的去看它們
這就是我做了一年、卻沒發現它是一個階段的那件事。
git status 告訴你「有沒有」卡片變了。它沒辦法告訴你是哪一張,因為 PNG 在終端機裡的 diff 就是一行「這兩份 bytes 不一樣」。所以每次發版都以同一件事結尾:打開資料夾,點過四十張圖,判斷德文那張還塞不塞得下,然後祈禱。那不是 review,那是瞇著眼睛看。
所以現在這條流程會自己畫一張總覽表(contact sheet)——一列一個語系,一欄一張卡,git 說變了的框紅色,新增的框綠色:
appkit review screenshots
一張圖,143 張卡,11 種語言。有三件事會從裡面掉出來,而它們是任何單檔 diff 都沒讓我看見過的:
- 格子上的一個洞,就是某個語系少了一個畫面。 這是整組圖最常見的出錯方式,也是一張一張看時最難發現的。
- 某一列長得跟其他列都不一樣,通常是那個語言的文字爆版了,而你現在一眼就看到,不用等到審查時才知道。
- 一張被框紅、但你講不出理由的卡,就是一個靜不下來的畫面。現在去追,不要等上傳完。
以前要發現這些事的代價,是打開 App Store Connect 瞇著眼睛比對。現在是一個指令、看一眼。
第五步:上傳
最後一哩是商店自己的 API——App Store 用 asc,Play 用 Publishing API——包起來,讓我永遠不用把它們的參數記在腦子裡:
appkit upload screenshots 1.3.0
不管你用什麼,有兩個細節值得偷:
- 圖片是依像素尺寸被分派到裝置家族的,而 App Store 的
--device-type是一個 過濾器。一組像素對不上你宣告的任何類型的圖,會上傳零個檔案,然後回報成功。這個 bug 我出過。每次都該拿你的卡片尺寸去對你宣告的顯示類型。 - 一組擷取可以餵兩個 listing。 西班牙文在商店上是
es-ES和es-MX,截圖完全一樣——渲染一次,上傳兩次。
指令是機制,skill 是判斷
腳本仍然是要記的東西,還得照順序、帶對參數。真正讓它像一隻機器人的那一層,是一個Claude Code skill——而這兩者之間的分界,才是最值得抄的部分。
指令寫檔案、搬 bytes。skill 帶的是腳本沒有的判斷:一個 settle floor 有沒有蓋過某個動畫的起手、這一版送審安不安全、某句標語該不該直接沿用 App 自己的字串。/appkit-release 是作業手冊,appkit ship 是機制。
這才是真正的解鎖。腳本讓工作變得可能;skill 讓工作變得可以交付出去——而且不像我對「上次我到底做了什麼」的記憶,skill 不會在兩次發版之間衰退。
免費複製這一切
| 階段 | 工具 | 費用 |
|---|---|---|
| 擷取 | simctl + App 內建 -ScreenshotMode | 免費(Apple) |
| 渲染 | CoreGraphics + CoreText | 免費(Apple) |
| 穩定 | 一道架在 git 上的「同一張畫面」閘門 | 免費 |
| 檢視 | 一張總覽表 | 免費 |
| 上傳 | asc / Play Publishing API | 免費 |
| 編排 | 一個 Claude Code skill + AGENTS.md | 免費 |
每一行都免費或開源,而且全部都在 appkit 裡,一個 brew install 就有。
結語
截圖從來不是難的部分。難的是那個迴圈——每一次設計改動都會默默讓一百張圖失效,而要發現這件事的代價,是你自己的眼睛。
把擷取自動化,省的是幾分鐘;讓 git 成為真相來源,救的是那個迴圈。而畫出那張總覽表是最讓我意外的一個:我從來沒自動化的那個階段,正是我每次發版都在手動做、卻從來沒把它當成一件工作的那個。